如何让 curl 命令通过代理访问
| 2018-01-18 10:35 收藏: 2
我的系统管理员给我提供了如下代理信息:
IP: 202.54.1.1
Port: 3128
Username: foo
Password: bar
该设置在 Google Chrome 和 Firefox 浏览器上很容易设置。但是我要怎么把它应用到 curl 命令上呢?我要如何让 curl 命令使用我在 Google Chrome 浏览器上的代理设置呢?
很多 Linux 和 Unix 命令行工具(比如 curl 命令,wget 命令,lynx 命令等)使用名为 http_proxy,https_proxy,ftp_proxy 的环境变量来获取代理信息。它允许你通过代理服务器(使用或不使用用户名/密码都行)来连接那些基于文本的会话和应用。
本文就会演示一下如何让 curl 通过代理服务器发送 HTTP/HTTPS 请求。
让 curl 命令使用代理的语法
语法为:
## Set the proxy address of your uni/company/vpn network ##
export http_proxy=http://your-ip-address:port/

## http_proxy with username and password
export http_proxy=http://user:password@your-proxy-ip-address:port/

## HTTPS version ##
export https_proxy=https://your-ip-address:port/
export https_proxy=https://user:password@your-proxy-ip-address:port/
另一种方法是使用 curl 命令的 -x 选项:
curl -x <[protocol://][user:password@]proxyhost[:port]> url
--proxy <[protocol://][user:password@]proxyhost[:port]> url
--proxy http://user:password@Your-Ip-Here:Port url
-x http://user:password@Your-Ip-Here:Port url
在 Linux 上的一个例子
首先设置 http_proxy:
## proxy server, 202.54.1.1, port: 3128, user: foo, password: bar ##
export http_proxy=http://foo:bar@202.54.1.1:3128/
export https_proxy=$http_proxy
## Use the curl command ##
curl -I https://www.cyberciti.biz
curl -v -I https://www.cyberciti.biz
输出为:
* Rebuilt URL to: www.cyberciti.biz/
*   Trying 202.54.1.1...
* Connected to 1202.54.1.1 (202.54.1.1) port 3128 (#0)
* Proxy auth using Basic with user 'foo'
> HEAD HTTP://www.cyberciti.biz/ HTTP/1.1
> Host: www.cyberciti.biz
> Proxy-Authorization: Basic x9VuUml2xm0vdg93MtIz
> User-Agent: curl/7.43.0
> Accept: */*
> Proxy-Connection: Keep-Alive
>
< HTTP/1.1 200 OK
HTTP/1.1 200 OK
< Server: nginx
Server: nginx
< Date: Sun, 17 Jan 2016 11:49:21 GMT
Date: Sun, 17 Jan 2016 11:49:21 GMT
< Content-Type: text/html; charset=UTF-8
Content-Type: text/html; charset=UTF-8
< Vary: Accept-Encoding
Vary: Accept-Encoding
< X-Whom: Dyno-l1-com-cyber
X-Whom: Dyno-l1-com-cyber
< Vary: Cookie
Vary: Cookie
< Link: <http://www.cyberciti.biz/wp-json/>; rel="https://api.w.org/"
Link: <http://www.cyberciti.biz/wp-json/>; rel="https://api.w.org/"
< X-Frame-Options: SAMEORIGIN
X-Frame-Options: SAMEORIGIN
< X-Content-Type-Options: nosniff
X-Content-Type-Options: nosniff
< X-XSS-Protection: 1; mode=block
X-XSS-Protection: 1; mode=block
< X-Cache: MISS from server1
X-Cache: MISS from server1
< X-Cache-Lookup: MISS from server1:3128
X-Cache-Lookup: MISS from server1:3128
< Connection: keep-alive
Connection: keep-alive

<
* Connection #0 to host 10.12.249.194 left intact
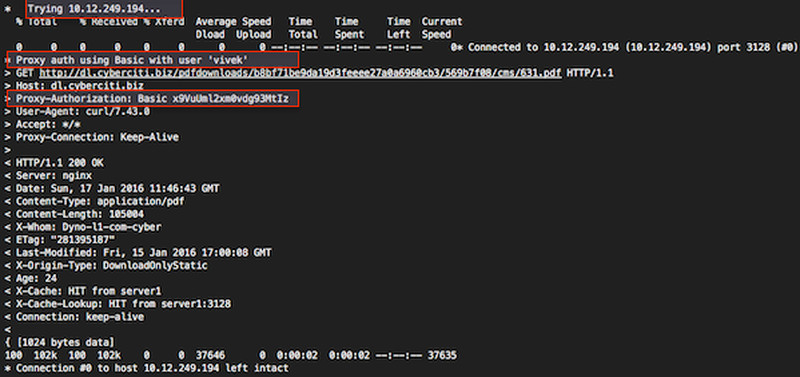
本例中,我来下载一个 pdf 文件:
$ export http_proxy="vivek:myPasswordHere@10.12.249.194:3128/"
$ curl -v -O http://dl.cyberciti.biz/pdfdownloads/b8bf71be9da19d3feeee27a0a6960cb3/569b7f08/cms/631.pdf
也可以使用 -x 选项:
curl -x 'http://vivek:myPasswordHere@10.12.249.194:3128' -v -O https://dl.cyberciti.biz/pdfdownloads/b8bf71be9da19d3feeee27a0a6960cb3/569b7f08/cms/631.pdf
输出为:
Unix 上的一个例子
$ curl -x http://prox_server_vpn:3128/ -I https://www.cyberciti.biz/faq/howto-nginx-customizing-404-403-error-page/
socks 协议怎么办呢?
语法也是一样的:
curl -x socks5://[user:password@]proxyhost[:port]/ url
curl --socks5 192.168.1.254:3099 https://www.cyberciti.biz/
如何让代理设置永久生效?
编辑 ~/.curlrc 文件:
$ vi ~/.curlrc
添加下面内容:
proxy = server1.cyberciti.biz:3128
proxy-user = "foo:bar"
保存并关闭该文件。另一种方法是在你的 ~/.bashrc 文件中创建一个别名:
## alias for curl command
## set proxy-server and port, the syntax is
## alias curl="curl -x {your_proxy_host}:{proxy_port}"
alias curl = "curl -x server1.cyberciti.biz:3128"
记住,代理字符串中可以使用 protocol:// 前缀来指定不同的代理协议。使用 socks4://,socks4a://,socks5://或者 socks5h:// 来指定使用的 SOCKS 版本。若没有指定协议或者使用 http:// 表示 HTTP 协议。若没有指定端口号则默认为 1080。-x 选项的值要优先于环境变量设置的值。若不想走代理,而环境变量总设置了代理,那么可以通过设置代理为空值("")来覆盖环境变量的值。详细信息请参阅 curl 的 man 页 。
via: https://www.cyberciti.biz/faq/linux-unix-curl-command-with-proxy-username-password-http-options/
作者:Vivek Gite 译者:lujun9972 校对:wxy


 );)