用 Python、 RabbitMQ 和 Nameko 实现微服务
| 2016-07-17 16:45 评论: 2 收藏: 1
"微服务是一股新浪潮" - 现如今,将项目拆分成多个独立的、可扩展的服务是保障代码演变的最好选择。在 Python 的世界里,有个叫做 “Nameko” 的框架,它将微服务的实现变得简单并且强大。
微服务
在最近的几年里,“微服务架构”如雨后春笋般涌现。它用于描述一种特定的软件应用设计方式,这种方式使得应用可以由多个独立部署的服务以服务套件的形式组成。 - M. Fowler
推荐各位读一下 Fowler 的文章 以理解它背后的原理。
好吧,那它究竟意味着什么呢?
简单来说,微服务架构可以将你的系统拆分成多个负责不同任务的小的(单一上下文内)功能块,它们彼此互无感知,各自只提供用于通讯的通用指向。这个指向通常是已经将通讯协议和接口定义好的消息队列。
这里给大家提供一个真实案例
案例的代码可以通过 github: http://github.com/rochacbruno/nameko-example 访问,查看 service 和 api 文件夹可以获取更多信息。
想象一下,你有一个 REST API ,这个 API 有一个端点(LCTT 译注:REST 风格的 API 可以有多个端点用于处理对同一资源的不同类型的请求)用来接受数据,并且你需要将接收到的数据进行一些运算工作。那么相比阻塞接口调用者的请求来说,异步实现此接口是一个更好的选择。你可以先给用户返回一个 "OK - 你的请求稍后会处理" 的状态,然后在后台任务中完成运算。
同样,如果你想要在不阻塞主进程的前提下,在计算完成后发送一封提醒邮件,那么将“邮件发送”委托给其他服务去做会更好一些。
场景描述

用代码说话
让我们将系统创建起来,在实践中理解它:
环境
我们需要的环境:
- 运行良好的 RabbitMQ(LCTT 译注:RabbitMQ 是一个流行的消息队列实现)
- 由 VirtualEnv 提供的 Services 虚拟环境
- 由 VirtualEnv 提供的 API 虚拟环境
Rabbit
在开发环境中使用 RabbitMQ 最简单的方式就是运行其官方的 docker 容器。在你已经拥有 Docker 的情况下,运行:
docker run -d --hostname my-rabbit --name some-rabbit -p 15672:15672 -p 5672:5672 rabbitmq:3-management
在浏览器中访问 http://localhost:15672 ,如果能够使用 guest:guest 验证信息登录 RabbitMQ 的控制面板,说明它已经在你的开发环境中运行起来了。

服务环境
现在让我们创建微服务来满足我们的任务需要。其中一个服务用来执行计算任务,另一个用来发送邮件。按以下步骤执行:
在 Shell 中创建项目的根目录
$ mkdir myproject
$ cd myproject
用 virtualenv 工具创建并且激活一个虚拟环境(你也可以使用 virtualenv-wrapper)
$ virtualenv service_env
$ source service_env/bin/activate
安装 nameko 框架和 yagmail
(service_env)$ pip install nameko
(service_env)$ pip install yagmail
服务的代码
现在我们已经准备好了 virtualenv 所提供的虚拟环境(可以想象成我们的服务是运行在一个独立服务器上的,而我们的 API 运行在另一个服务器上),接下来让我们编码,实现 nameko 的 RPC 服务。
我们会将这两个服务放在同一个 python 模块中,当然如果你乐意,也可以把它们放在单独的模块里并且当成不同的服务运行:
在名为 service.py 的文件中
import yagmail
from nameko.rpc import rpc, RpcProxy

class Mail(object):
    name = "mail"

    @rpc
    def send(self, to, subject, contents):
        yag = yagmail.SMTP('myname@gmail.com', 'mypassword')
        # 以上的验证信息请从安全的地方进行读取
        # 贴士: 可以去看看 Dynaconf 设置模块
        yag.send(to=to.encode('utf-8),
                 subject=subject.encode('utf-8),
                 contents=[contents.encode('utf-8)])

class Compute(object):
    name = "compute"
    mail = RpcProxy('mail')

    @rpc
    def compute(self, operation, value, other, email):
        operations = {'sum': lambda x, y: int(x) + int(y),
                      'mul': lambda x, y: int(x) * int(y),
                      'div': lambda x, y: int(x) / int(y),
                      'sub': lambda x, y: int(x) - int(y)}
        try:
            result = operations[operation](value, other)
        except Exception as e:
            self.mail.send.async(email, "An error occurred", str(e))
            raise
        else:
            self.mail.send.async(
                email,
                "Your operation is complete!",
                "The result is: %s" % result
            )
            return result
现在我们已经用以上代码定义好了两个服务,下面让我们将 Nameko RPC service 运行起来。
注意:我们会在控制台中启动并运行它。但在生产环境中,建议大家使用 supervisord 替代控制台命令。
在 Shell 中启动并运行服务
(service_env)$ nameko run service --broker amqp://guest:guest@localhost
starting services: mail, compute
Connected to amqp://guest:**@127.0.0.1:5672//
Connected to amqp://guest:**@127.0.0.1:5672//
测试
在另外一个 Shell 中(使用相同的虚拟环境),用 nameko shell 进行测试:
(service_env)$ nameko shell --broker amqp://guest:guest@localhost
Nameko Python 2.7.9 (default, Apr  2 2015, 15:33:21)
[GCC 4.9.2] shell on linux2
Broker: amqp://guest:guest@localhost
>>>
现在你已经处在 RPC 客户端中了,Shell 的测试工作是通过 n.rpc 对象来进行的,它的使用方法如下:
>>> n.rpc.mail.send("name@email.com", "testing", "Just testing")
上边的代码会发送一封邮件,我们同样可以调用计算服务对其进行测试。需要注意的是,此测试还会附带进行异步的邮件发送。
>>> n.rpc.compute.compute('sum', 30, 10, "name@email.com")
40
>>> n.rpc.compute.compute('sub', 30, 10, "name@email.com")
20
>>> n.rpc.compute.compute('mul', 30, 10, "name@email.com")
300
>>> n.rpc.compute.compute('div', 30, 10, "name@email.com")
3
在 API 中调用微服务
在另外一个 Shell 中(甚至可以是另外一台服务器上),准备好 API 环境。
用 virtualenv 工具创建并且激活一个虚拟环境(你也可以使用 virtualenv-wrapper)
$ virtualenv api_env
$ source api_env/bin/activate
安装 Nameko、 Flask 和 Flasgger
(api_env)$ pip install nameko
(api_env)$ pip install flask
(api_env)$ pip install flasgger
注意: 在 API 中并不需要 yagmail ,因为在这里,处理邮件是服务的职责
创建含有以下内容的 api.py 文件:
from flask import Flask, request
from flasgger import Swagger
from nameko.standalone.rpc import ClusterRpcProxy

app = Flask(__name__)
Swagger(app)
CONFIG = {'AMQP_URI': "amqp://guest:guest@localhost"}


@app.route('/compute', methods=['POST'])
def compute():
    """
    Micro Service Based Compute and Mail API
    This API is made with Flask, Flasgger and Nameko
    ---
    parameters:
      - name: body
        in: body
        required: true
        schema:
          id: data
          properties:
            operation:
              type: string
              enum:
                - sum
                - mul
                - sub
                - div
            email:
              type: string
            value:
              type: integer
            other:
              type: integer
    responses:
      200:
        description: Please wait the calculation, you'll receive an email with results
    """
    operation = request.json.get('operation')
    value = request.json.get('value')
    other = request.json.get('other')
    email = request.json.get('email')
    msg = "Please wait the calculation, you'll receive an email with results"
    subject = "API Notification"
    with ClusterRpcProxy(CONFIG) as rpc:
        # asynchronously spawning and email notification
        rpc.mail.send.async(email, subject, msg)
        # asynchronously spawning the compute task
        result = rpc.compute.compute.async(operation, value, other, email)
        return msg, 200

app.run(debug=True)
在其他的 shell 或者服务器上运行此文件
(api_env) $ python api.py
 * Running on http://127.0.0.1:5000/ (Press CTRL+C to quit)
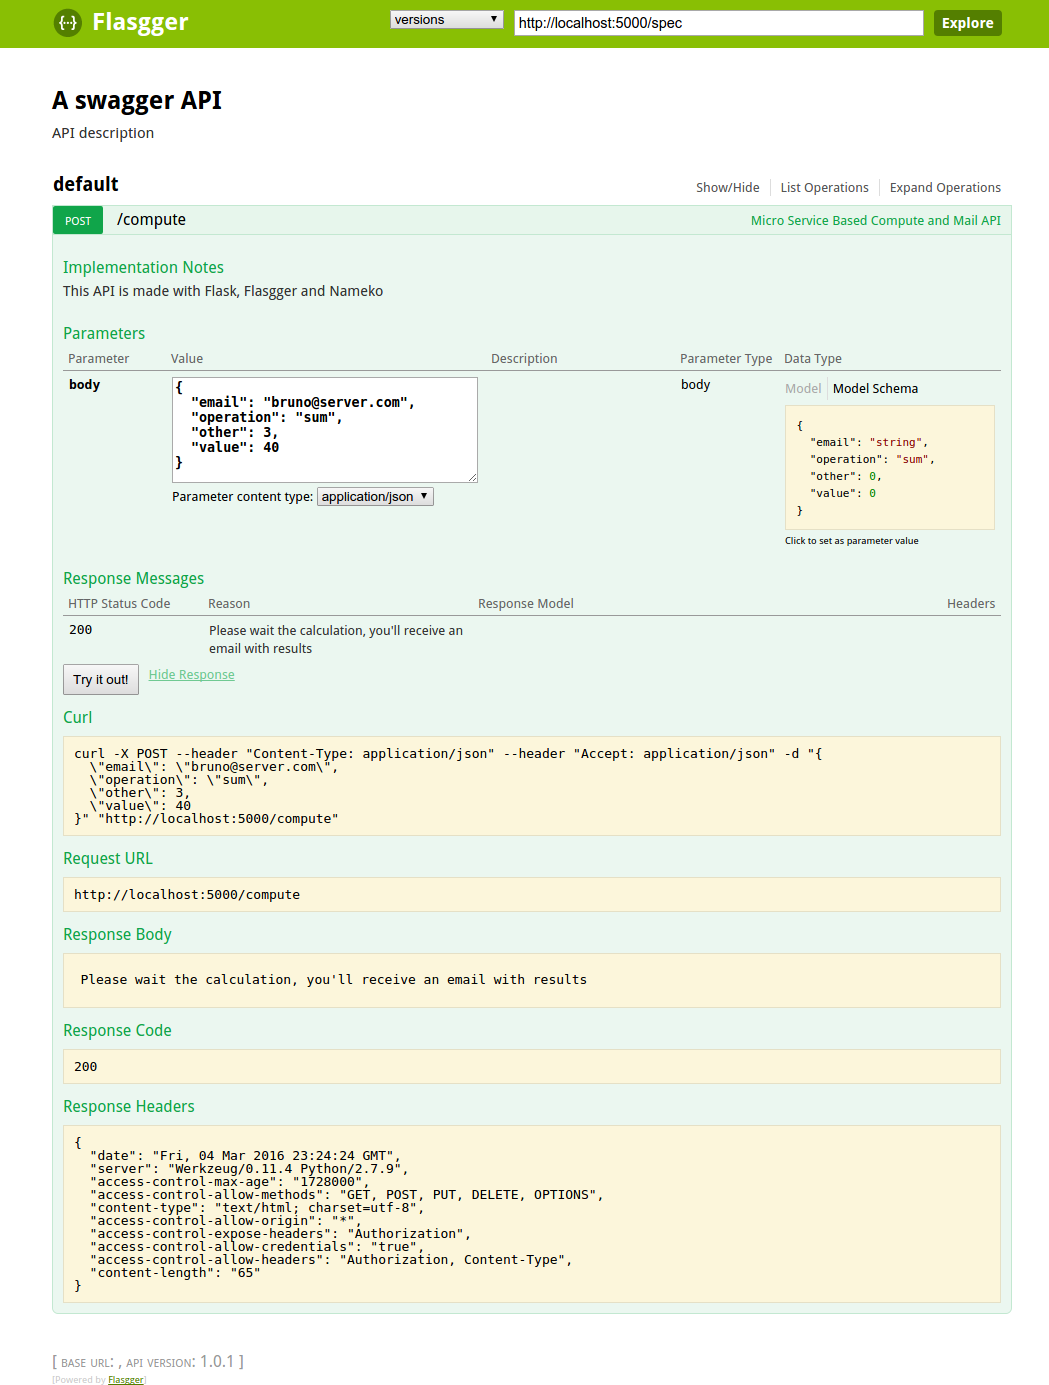
然后访问 http://localhost:5000/apidocs/index.html 这个 url,就可以看到 Flasgger 的界面了,利用它可以进行 API 的交互并可以发布任务到队列以供服务进行消费。
注意: 你可以在 shell 中查看到服务的运行日志,打印信息和错误信息。也可以访问 RabbitMQ 控制面板来查看消息在队列中的处理情况。
Nameko 框架还为我们提供了很多高级特性,你可以从 https://nameko.readthedocs.org/en/stable/ 获取更多的信息。
别光看了,撸起袖子来,实现微服务!
via: http://brunorocha.org/python/microservices-with-python-rabbitmq-and-nameko.html
作者: Bruno Rocha 译者: mr-ping 校对: wxy

- [1]来自广东广州的 Firefox 45.0|GNU/Linux 用户 发表于 2016-07-17 21:09 的评论:写的一般般
- PingYang [Chrome 43.0|GNU/Linux] 2016-07-18 10:26 12 赞
- 微服务是个挺宽的概念,实现模式和方法无定式。作者只是通过一个特定案例来给我们一个大概印象。我们可以根据自己需求换用其他消息中间件,或者干脆用celery这样的任务分发来代替消息队列,甚至不需要Nameko这种框架,自己实现RPC。更甚不用RPC全程http。等等等等。

 );)